Siemens S7-1500 Client Tutorial
The Siemens S7-1500 PLC, together with the Siemens TIA Portal version 15.1 and above, can be used as an OPC UA client and thus connect to the OPC UA server of the robot control. The robot control needs to be on version 5.4.0 or higher. The version 5.4.0 has limitations that are explained in the current limitations section.
The example project from the Siemens website. serves as a starting point. The project is available for TIA Portal version 15.1 and 16, but the project with version 16 can also be upgraded to newer versions of TIA. The following tutorial assumes you are using TIA version 16 or above.
Opening the project and first steps
After downloading and unzipping the example project, you can open the .ap16 file on the TIA Portal
welcome page. If your version exceeds 16, the project will be automatically upgraded to the used version.
Afterwards, you have to click Open the project view to visualize the project.
In the path Security settings / Settings you must protect the project with a user and a password.
Unprotected projects are not supported by the OPC UA server of Franka Emika’s robot family FP3 / FR3.
Note that you will need these login credentials after this step to access the project.
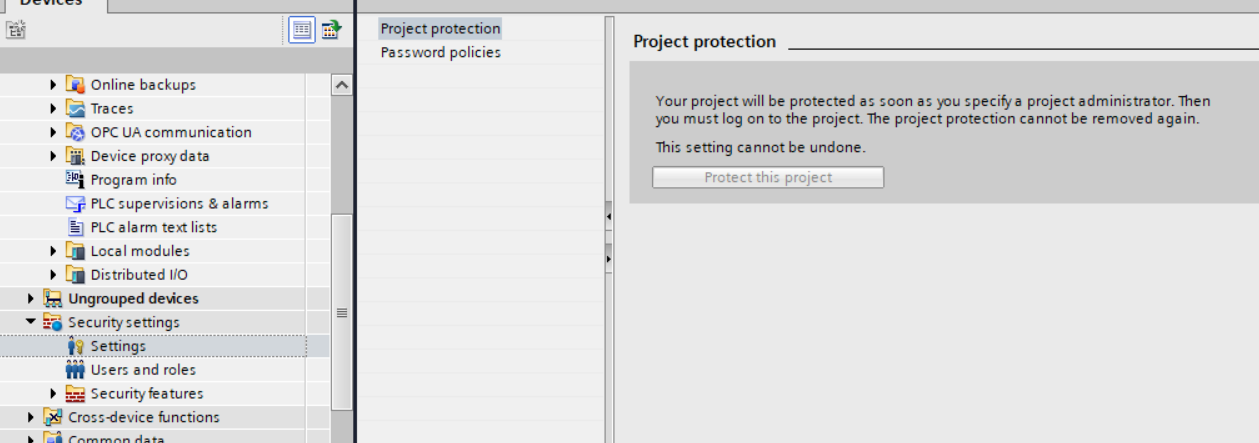
Activating the project protection
After that, you might have to change the device type because your S7-1500 might not be the same model
or have the same firmware version as the one that’s used in the example project.
In the Device configuration of the OPC_UA_Client folder, you need to right-click on the device and select Change device.
Please check the Siemens documentation to change the PLC to another type that is not S7-1500.
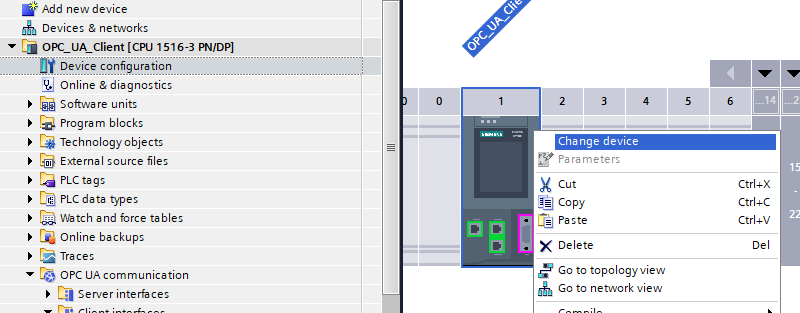
Changing the device
Activating the Global security settings for the project is necessary for the connection to the robot. This option
is located in the Protection & Security / Certificate Manager of the Device configuration / General tab.
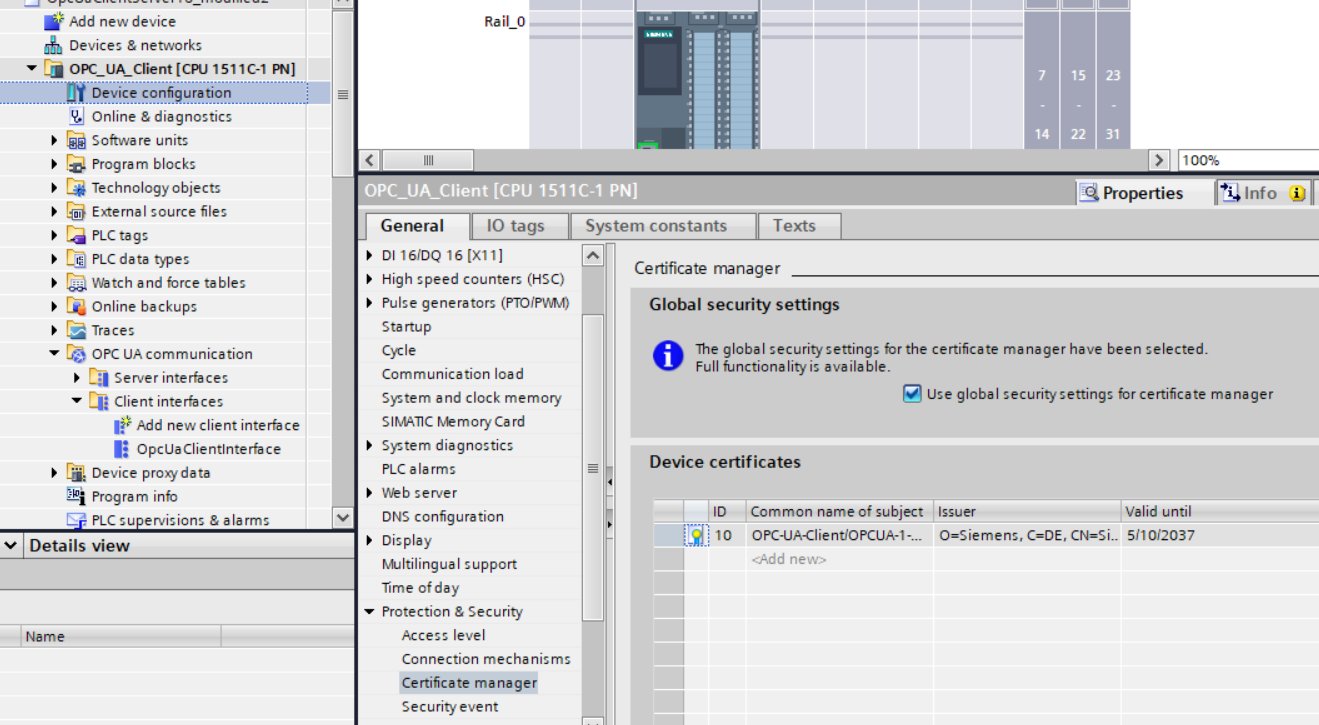
Global security settings.
You can change the IP settings assigned to the PLC in the tab opened in the lower part of the screen
after double-clicking on the Ethernet port of the device image.
In this tab, navigate to Properties / General / Ethernet addresses.
Configuring the connection to the OPC UA server
In the OpcUaClientInterface (in path OPC UA communication / Client interfaces) settings,
you can enter the IP address assigned to the robot control in your network,
which in the above screenshot is 192.168.1.174. The port should be set to the default OPC UA port: 4840.
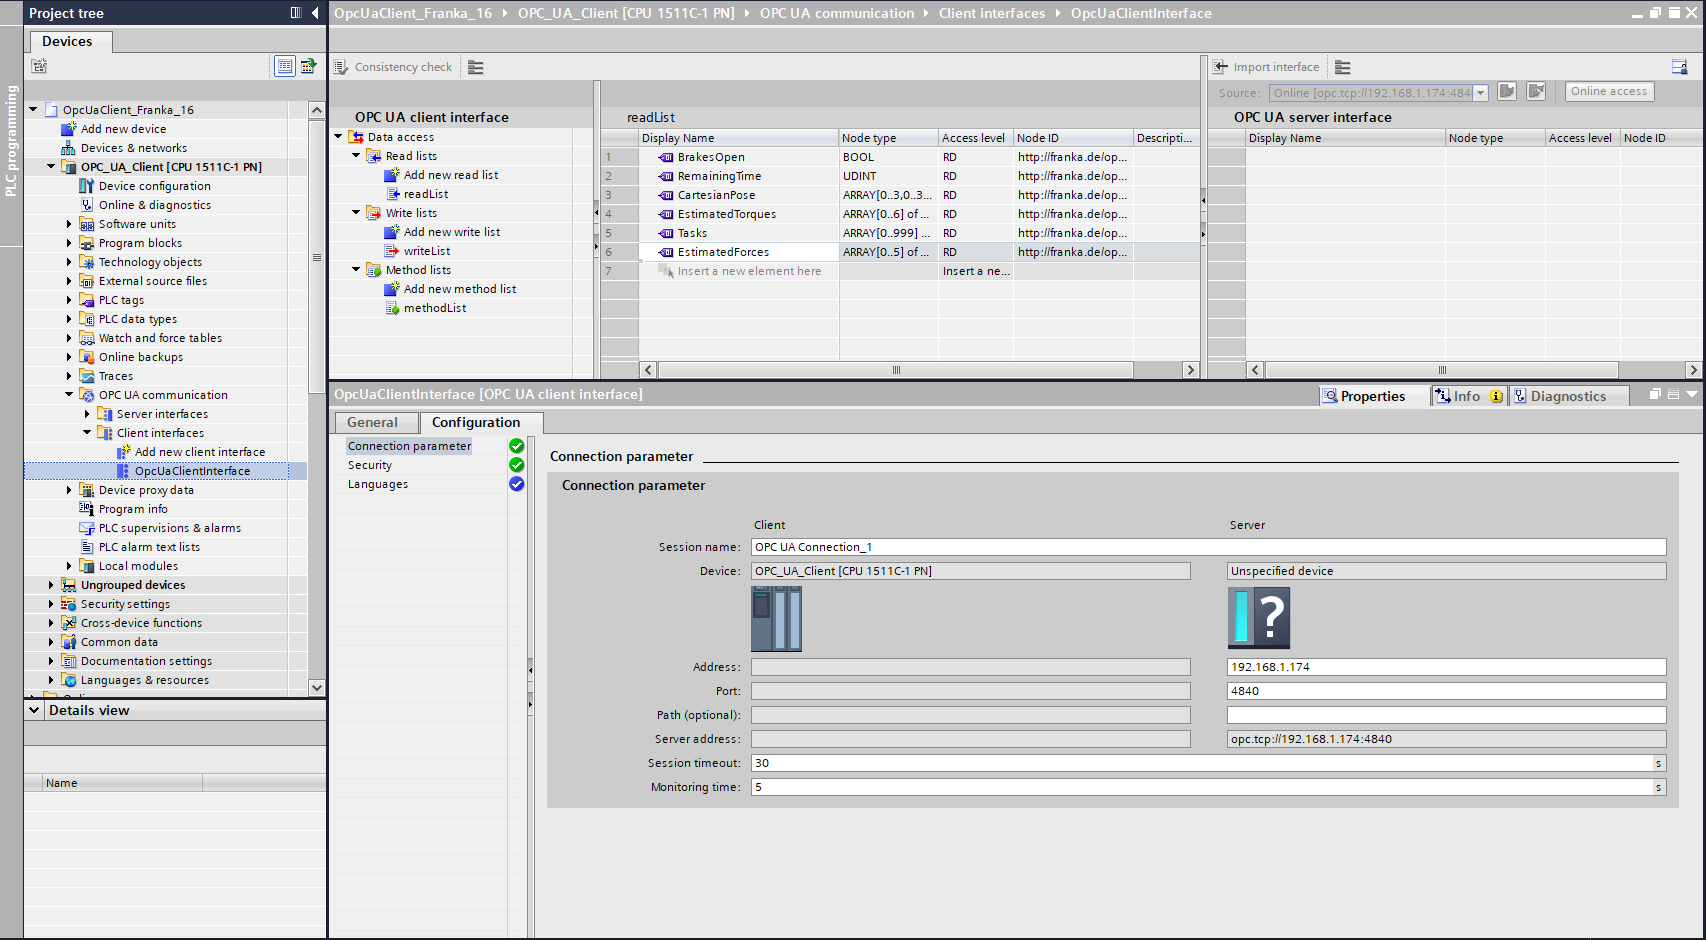
Open the client interface settings.
In the Security section of the same tab, you should select either a signed or a signed & encrypted connection
as the Security mode, otherwise, the login doesn’t work because the S7 doesn’t want to transmit passwords via an unencrypted connection.
Note that the password is still encrypted when selecting a signed connection without encryption,
even though the rest of the communication is in plaintext. The Security policy should be set to Basic256Sha256.
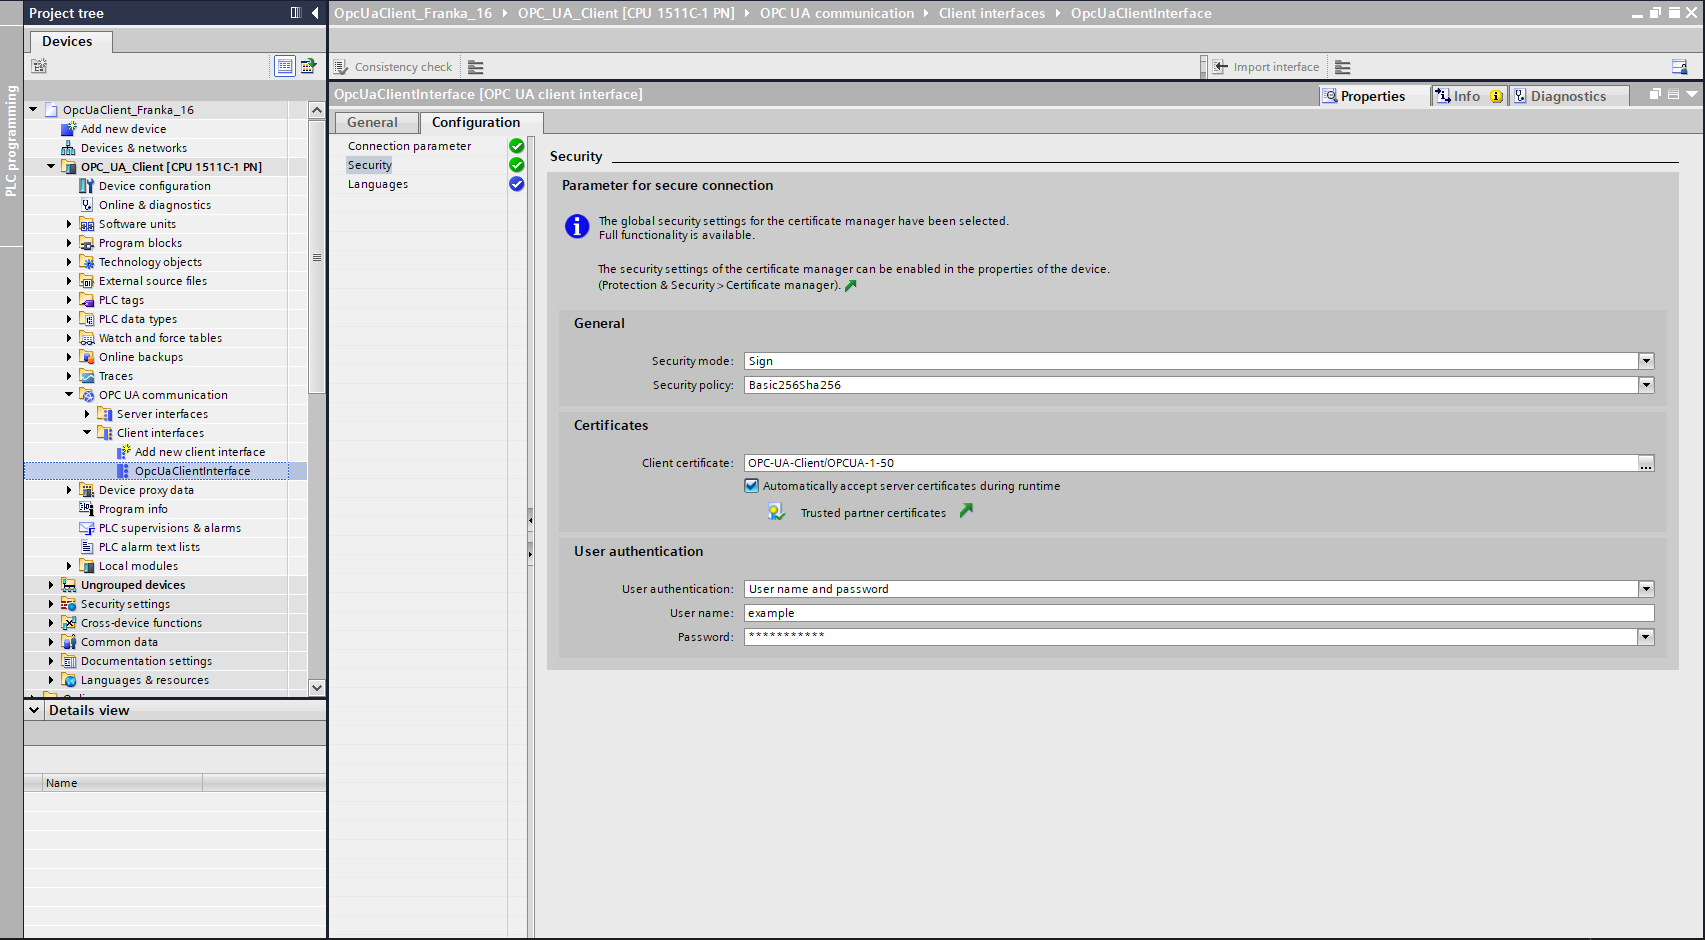
OPC UA client security settings.
By clicking on the three points on the right of the Client certificate dropdown menu, you can generate
a new certificate so that the PLC can later use it to identify itself when communicating with the OPC UA server.
The most important parameters of the certificate are the usage, which should be OPC UA client,
the URI, which can be set to the default value urn:SIMATIC.S7-1500.OPC-UA.Application:OPC_UA_Client and
the IP, which is the IP of the S7 PLC, not of the robot control.
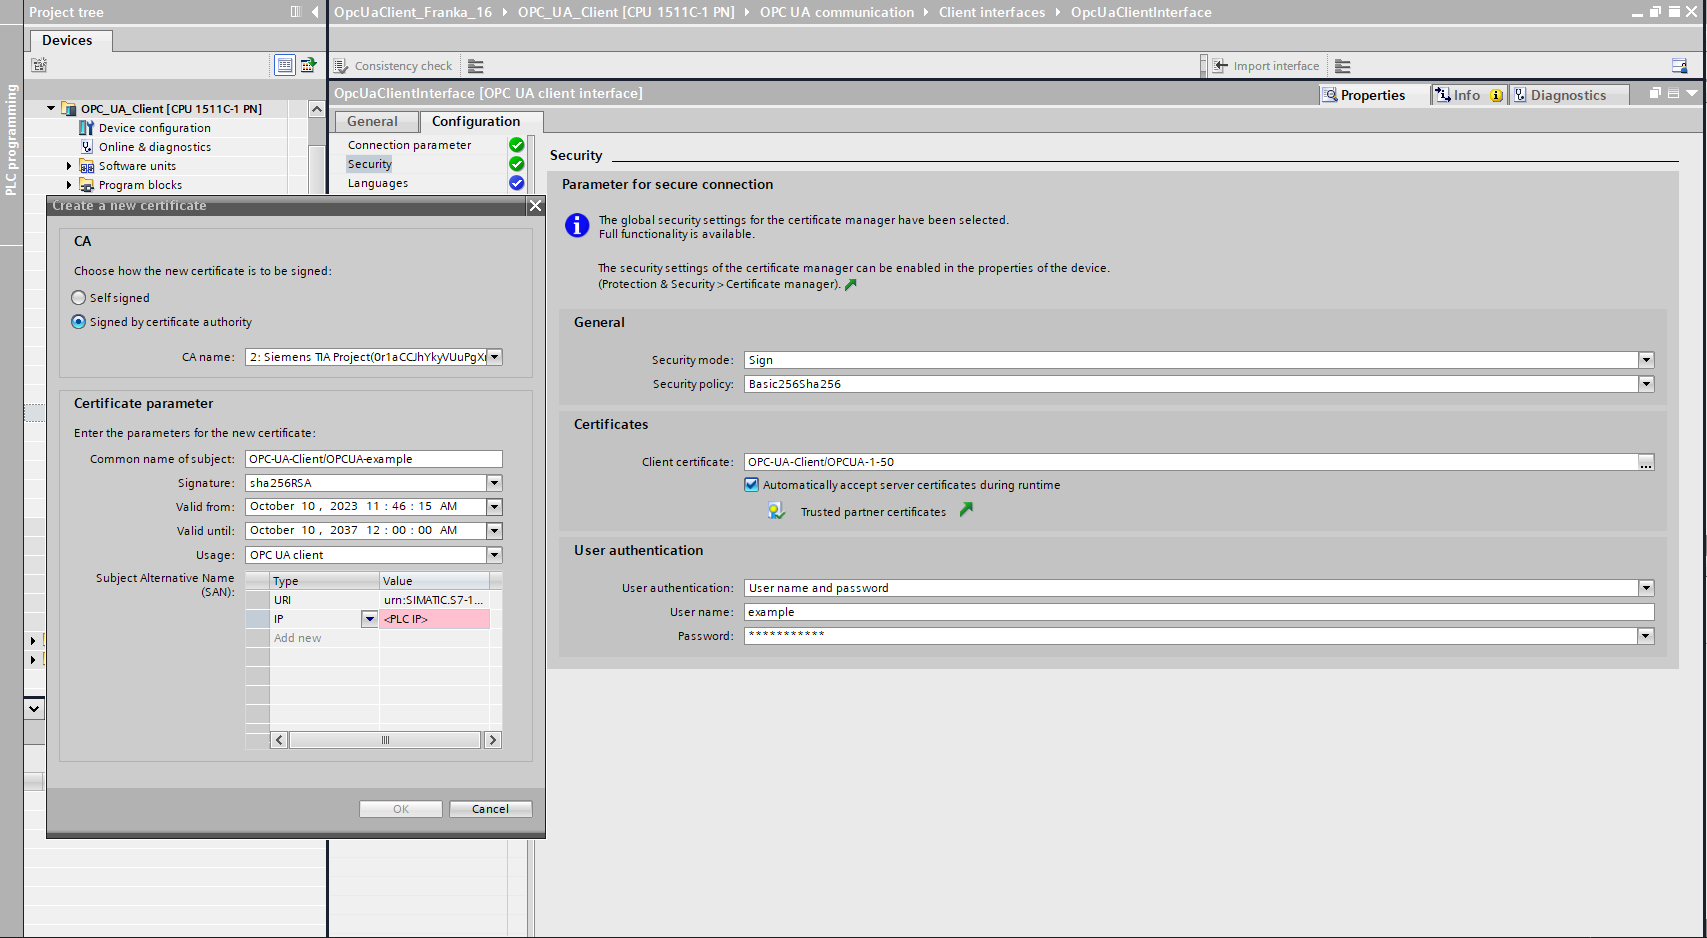
Creating a new OPC UA certificate.
You should activate the option to automatically accept the server certificate at runtime. The alternative to
activating this option is to insert the certificate of the robot (the one that is sent when accessing DESK in a browser)
as a trusted certificate in the Certificate manager, which you can find under security settings in your TIA Portal project.
Select User name and Password as the Authentication mechanism and insert the user name and password you use to access DESK.
Selecting variables and methods
There is a dropdown selector on the top right panel of the OpcUaClientInterface settings (marked in red in the picture below)
where you can browse and load OPC UA functions into the PLC: import interface or online access.
By selecting imported interface and clicking on the button Import interface, you can import the functions
with the XML that you can download here.
By choosing online access and clicking on the button Online access, a connection can be established
from the TIA Portal directly to the OPC UA Server by entering the same connection settings as the previous section.
With both options, you can browse available variables on the server, such as BrakesOpen, and insert them via drag and drop
in the readList. Methods need to be inserted in the methodList. Both lists are available on the menu on the left.
Note: Check Current limitations for information
on unsupported features or features that must be imported with imported interface.
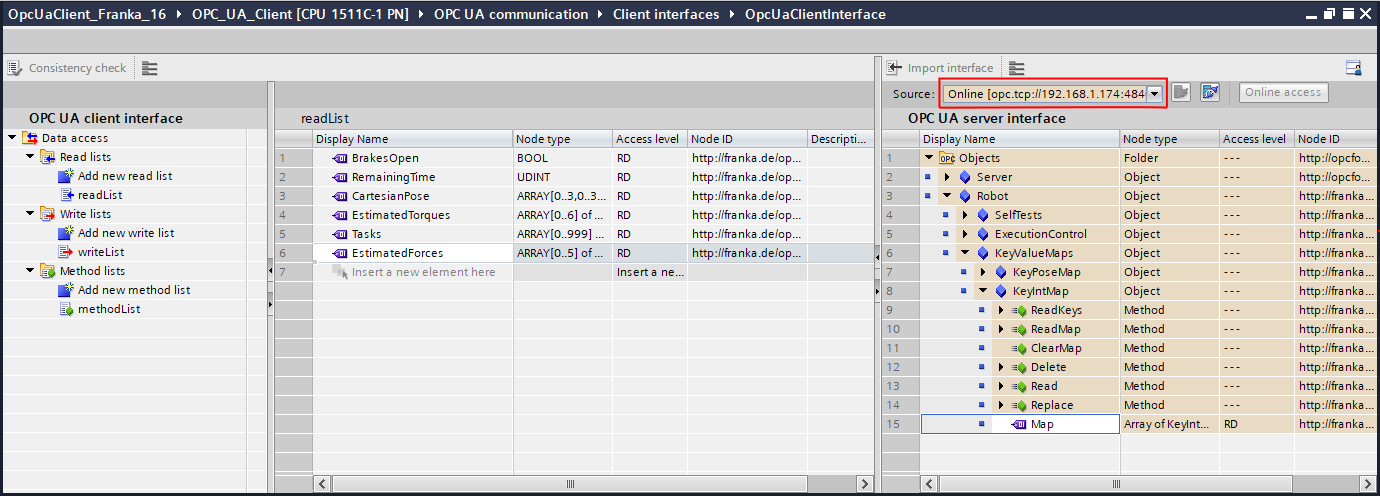
Drag and drop variables and methods in data access of the PLC.
Next, the program of the example project needs to be adapted to call the imported methods.
There are three options to do this. The first option is to modify the fields inputArguments
and outputArguments of the Main block located in Program blocks. In the example
of Read, inputArguments is set to "OpcUaClientInterface_Data".methodList.Read.Inputs and
outputArguments to "OpcUaClientInterface_Data".methodList.Read.Outputs.
The respective field has to be set to NULL for methods without input and/or output arguments.
If it is desired to call other methods, these fields must be modified and the program compiled.
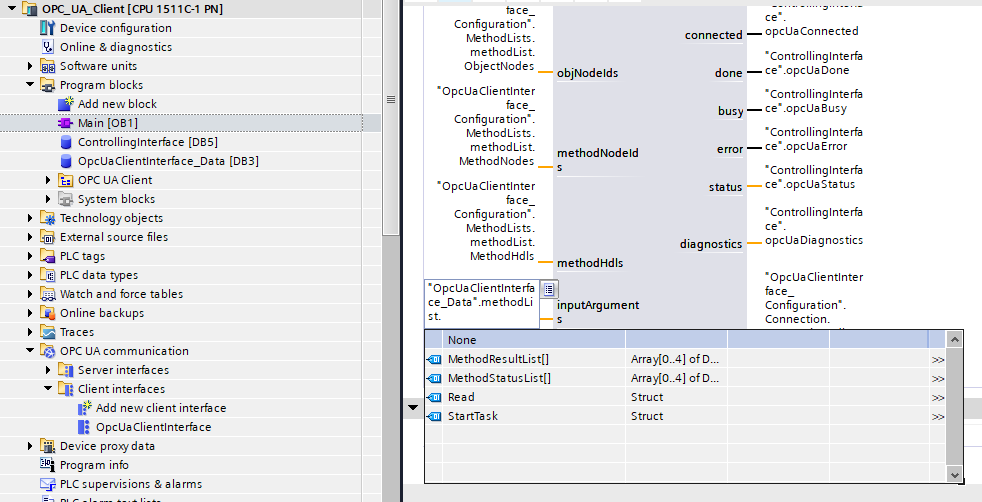
First option of setting the arguments of a method
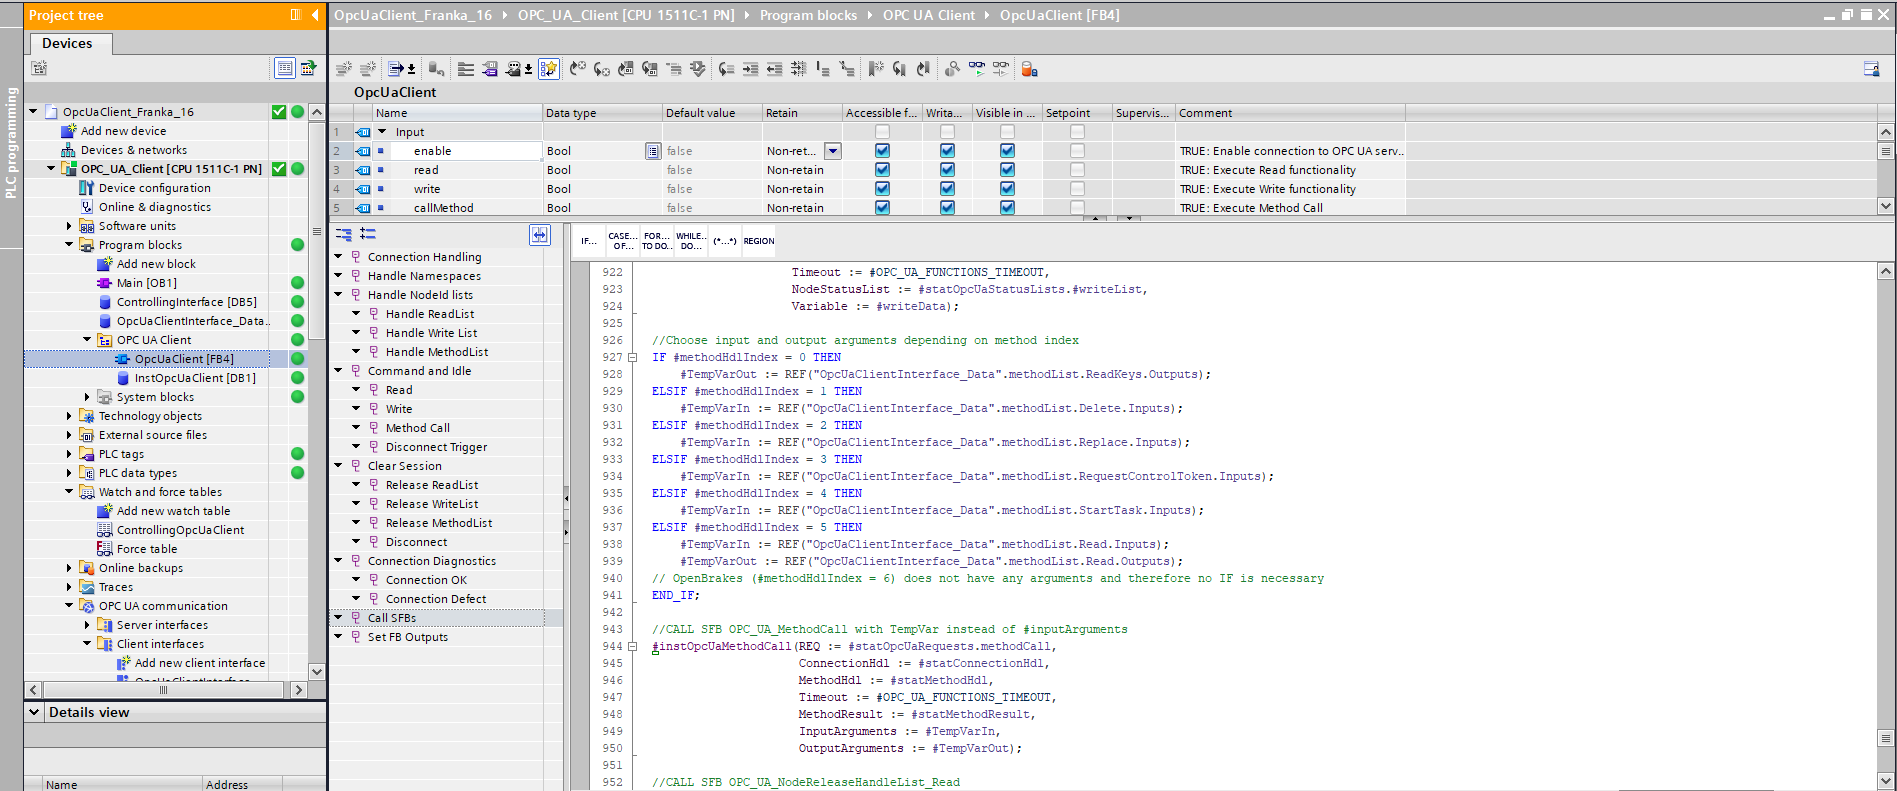
The second option is to add some code (in SCL language) for the inserted methods in the methodList.
This code has to be copied into the OpcUAClient [FB4] block (in the path
Program blocks / OPC UA Client) at line 926. Before that, two temporary variables need to be created:
TempVarIn and TempVarOut. This can be done in the table above the code in the Temp field.
This table is visible in the image below.
An example of the code for the particular methodList shown in this image is given:
// Choose input and output args depending on method index
  IF #methodHdlIndex = 0 THEN
      #TempVarOut := REF("OpcUaClientInterface_Data".methodList.ReadKeys.Outputs);
  ELSIF #methodHdlIndex = 1 THEN
      #TempVarIn := REF("OpcUaClientInterface_Data".methodList.Delete.Inputs);
  ELSIF #methodHdlIndex = 2 THEN
      #TempVarIn := REF("OpcUaClientInterface_Data".methodList.Replace.Inputs);
  ELSIF #methodHdlIndex = 3 THEN
      #TempVarIn := REF("OpcUaClientInterface_Data".methodList.RequestControlToken.Inputs);
  ELSIF #methodHdlIndex = 4 THEN
      #TempVarIn := REF("OpcUaClientInterface_Data".methodList.StartTask.Inputs);
  ELSIF #methodHdlIndex = 5 THEN
      #TempVarIn := REF("OpcUaClientInterface_Data".methodList.Read.Inputs);
      #TempVarOut := REF("OpcUaClientInterface_Data".methodList.Read.Outputs);
  END_IF;

  // IMPORTANT: Delete or comment the original instOpcUaMethodCall function call

  //CALL SFB OPC_UA_MethodCall with custom arguments
  #instOpcUaMethodCall(REQ := #statOpcUaRequests.methodCall,
                      ConnectionHdl := #statConnectionHdl,
                      MethodHdl := #statMethodHdl,
                      Timeout := #OPC_UA_FUNCTIONS_TIMEOUT,
                      MethodResult := #statMethodResult,
                      InputArguments := #TempVarIn,
                      OutputArguments := #TempVarOut);
If the method does not have any arguments, there is no arrow next to the method on the importing tab
(in the first image of the section, ClearMap). In this case, no if condition is needed.
It is essential to add the methods to the methodList and compile before modifying the code to avoid errors.
Code for the second option of setting the arguments of a method
The third option is only available for TIA Portal version 17 and above. A compact instruction OPC_UA_MethodCall_C
can call a method specifically. This instruction can be selected from the instruction list
on the right side of the screen after clicking on a program block, for example, Main.
If more than one parallel instruction is used, it is important to check that all use the same
connection handle and do not create a new connection.
Loading the project to the S7-1500
In order to load the project in the PLC, use the option Download to device, which is available
in the top bar or with a right-click in the top project folder. Some settings, for example the IP address
assigned to the PLC, count as hardware settings, and others as software settings. In case of doubt,
it is easier to just load both the Hardware and Software configuration to the device after making any changes.
If a change is not installed, it will highlight it in the menu in orange or orange and blue instead of green.
In our tests we sometimes ran into the situation where the first attempt to load the project to the S7
resulted in some error in the next phase, but downloading the project again as Software (all) fixed the problem.
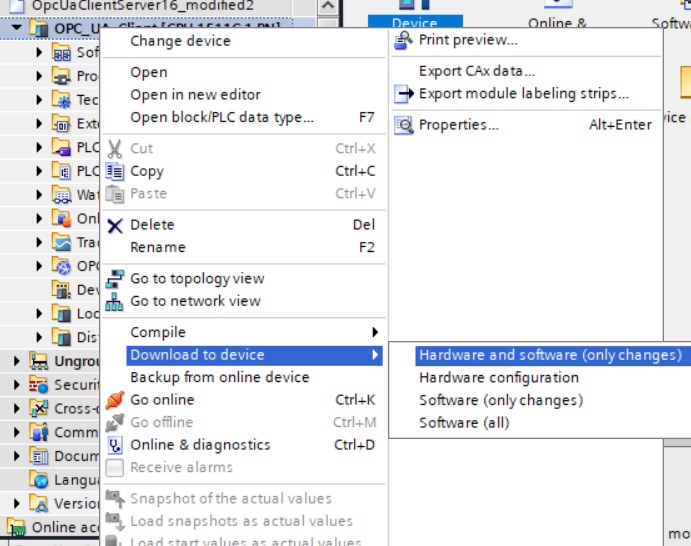
Loading the settings to the connected PLC.
The following menu can appear if it is the first time downloading the project to the PLC. The connection settings can be different in each setup.
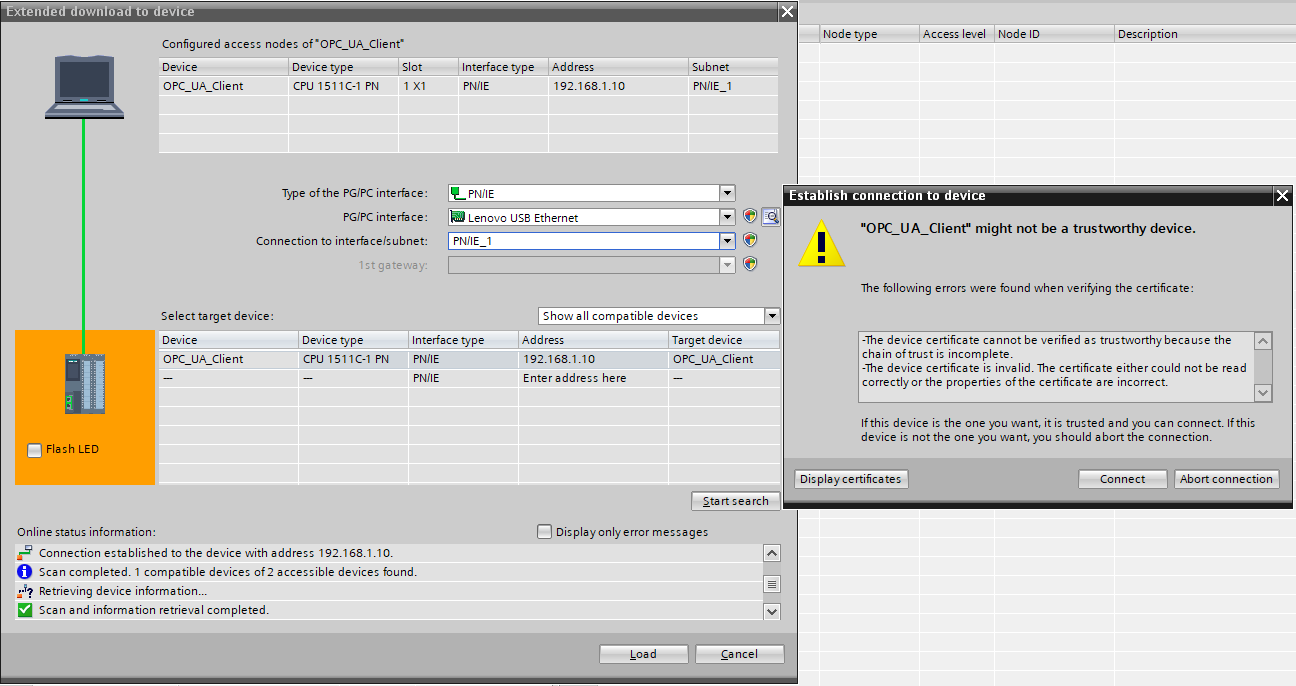
Connection settings to the PLC.
Starting the OPC UA connection and using the features
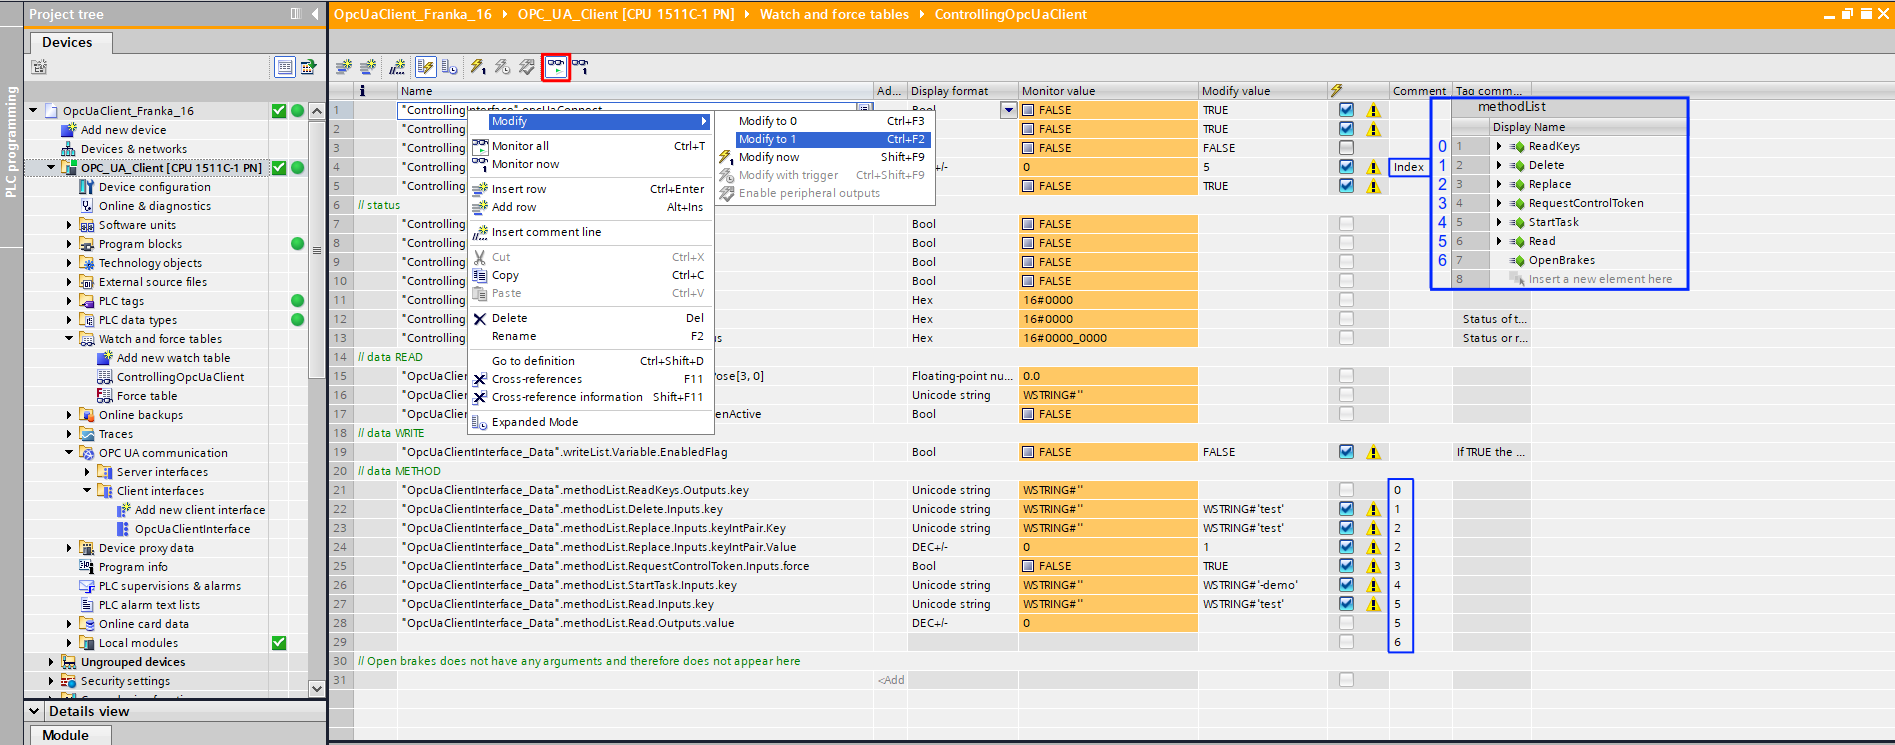
Controlling the OPC UA client at runtime.
A prerequisite is that the PLC is in Run mode and the program is online (by clicking Go Online at the top
of the screen). The ControllingOpcUaClient table (in the folder Watch and force tables) can be used to
set variables and call methods at runtime. This table contains by default unused variables from the example project.
They can be substituted with the variables and methods you want to track. An example is in
the image above. When you have added all your variables and methods,
you can activate the monitoring mode by clicking on the button with the glasses and the green arrow
(marked in red in the image above.). Note that the current value set on the PLC
is on the Monitor Value column, and Modify Value is only a temporary value that you must upload to the PLC.
The OPC UA client can be started by right-clicking the "ControllingInterface".opcUaConnect variable and Modify to 1.
In the status section, the variable "ControllingInterface".opcUaConnected indicates whether the client
successfully connected. The "ControllingInterface".opcUaDiagnostics.subfunctionStatus variable
contains error codes that can be used to debug connection problems. The Error Code Reference section
lists common errors. For the full list of possible errors, consult
the OPC UA specification in Part 6 Annex A 2.
Additional help can also be found in the
documentation of the example project.
Once the connection is established ("ControllingInterface".opcUaConnected is True) you can read variables from the server
by setting opcUaRead to True. Afterwards, the values in the // data READ section should update.
To call methods you must first select the correct method index in "ControllingInterface".opcUaMethodIndex.
This index starts at 0 and refers to the order that you used in the method list in the OPC UA client interface configuration.
The image above includes a screenshot from the methodList with the index of each method on the left.
As a hint, there is an index next to each method marked in blue in the image above.
The method call can then be triggered by setting opcUaMethodCall to 1. In the example of calling the method Replace,
the input arguments Key and Value have be set to the desired values. The correct MethodIndex is 2,
as it is the number on the comment section. After setting those values to Monitor value,
the method can be called by setting "ControllingInterface".opcUaConnect to True.
Current Limitations
The S7 OPC UA client cannot load certain features of KeyPoseMap.
Right now this includes the variable Map and the method ReadMap (only from KeyPoseMap).
The method Replace from KeyPoseMap must be imported from the XML File and not with online access.
In version 5.4.0, there are some extra limitations that will be resolved in the next release.
These are the variable Map and the methods ReadMap, Replace, and ReadKeys from KeyIntMap;
the methods Read, Replace, and ReadKeys from KeyPoseMap;
and the variables Tasks, EstimatedForces, EstimatedTorques, and JointAngles from ExecutionControl.
Error Code Reference
- 16#8005_0000 : BadCommunicationError
“A low level communication error occurred.”
The given IP address is probably wrong or the connection cannot be made to the robot control with the IP settings.
- 16#8017_0000 : BadCertificateUriInvalid
“The URI specified in the Application Description does not match the URI in the Certificate.”
In our attempts, we had the problem that this error could not be fixed in robot versions previous to 5.4.0. In this case, please update the robot.
Another possibility is trying to regenerate the certificate used by the client. The Subject Alt Names list of the certificate should contain the client Application URI, by default
urn:SIMATIC.S7-1500.OPC-UA.Application:OPC_UA_Client.- 16#801F_0000 : BadUserAccessDenied
“User does not have permission to perform the requested operation.”
Check your user name / password.
- 16#803E_0000 : BadNotFound
“A requested item was not found or a search operation ended without success.”
Check if you called a method with arguments that do not exist. We encountered this error by calling delete with a key not present in the map.
- 16#8055_0000 : BadSecurityPolicyRejected
“The security policy does not meet the requirements by the Server.”
Check if you selected the correct encryption algorithm in TIA. By default, it is Basic128Rsa15, which is outdated and thus not provided on the robot’s OPC UA server. Select Basic256Sha256 instead.
- 16#806F_0000 : BadNoMatch
“The requested operation has no match to return.”
When this error appeared in our tests, the communication showed no errors. The problem was that we still had a variable from the example project in the write list. Even though we weren’t calling the write operation, the S7 still tried to find the specified variable.
- 16#8074_0000 : BadTypeMismatch
“The value supplied for the attribute is not of the same type as the attribute’s value.”
Trying to call the
Readmethod on theKeyIntMapwith an incorrect variable name also results in this error in the S7 OPC UA Client block, not just type errors.- 16#8076_0000 : BadArgumentsMissing
“The client did not specify all of the input arguments for the method.”
Depending on your method call option, check the block fields of the arguments or the modified code from the
OpcUAClient [FB4]block. Then, verify the index of the method you are trying to call.- 16#80AF_0000 : BadInvalidState
“The operation cannot be completed because the object is closed, uninitialized or in some other invalid state.”
Check that the OPC UA has an active token for the methods that need a control token. The variable
ControlTokenActiveshould beTrue.- 16#80E5_0000 : BadTooManyArguments
“Too many arguments were provided”
Depending on your method call option, check the block fields of the arguments or the modified code from the
OpcUAClient [FB4]block. Then, verify the index of the method you are trying to call.- 16#80E6_0000 : BadSecurityModeInsufficient
“The operation is not permitted over the current secure channel.”
The connection is probably through an unencrypted user name and password, which Siemens doesn’t allow apparently. Try to use either switch to a signed or signed & encrypted connection.